
Josie Bra & Pants
Join us in sewing your very own two piece underwear set in our Josie Bra and Pants Online Workshop.
We’ll show you how to measure and cut, work with elastic and stretch fabrics and you will have your very own handmade bra and pants in just a few sessions. You can buy the Josie Bra & Pants pattern as a pdf (so you can print off at home) or paper and we also have kits which include the paper pattern and all the fabric you’d need. Enjoy!
While nothing can replace the feeling of being in a room and seeing the incredible creations we make together in person, an online workshop is the next best thing. Our Josie workshop runs on a ‘pay what you can’ donation basis and any small amount would be greatly appreciated!
Day 1 // Measure & Cut
Welcome to Day 1 of our Josie Bra & Pants sewing tutorial! To prepare you will need to have either bought the printed version of the Josie Bra and Pants Pattern or printed out the PDF version at home and stuck the A4 pieces of paper together.
I recommend watching the film all the way through once so that you know what is coming and then starting it again and pausing on each step to do it yourselves. I’ve included some of the key information below for those of you who like to read rather than listen! (Subtitles are also available on the film by clicking the icon in the bottom right corner.)
We would love to know where all of you are joining us from, so please do let us know in the comment section at the bottom, along with what fabric you have decided to use!
Measuring yourself accurately is the first step towards getting a great fit on the garment.
Let’s start with the Bra Measurements…
Measure your bust and under bust using a tape measure. Your bust measurement is the fullest part of your chest. Your under bust measurement is directly below your bust. Make sure the tape measure is parallel to the floor all the way round as you do this. Please ignore how wonky I do it in the video! It’s very hard measuring whilst speaking to camera!
Once you have both measurements refer to our size chart below and see which size you are closest to. If your bust and under bust fall in two different sizes I would recommend using the size your under bust falls into. The cups will stretch and can be adjusted depending on the strap length. If you want to you can make the underband (D/E) in one size and the cups/back strap (A/B/C) in another size. Your notches will no longer match up but the pattern will still work so long as the cups and underband are less than two sizes apart.
Great, now for the pants…
Measure your upper hips using a tape measure. Your upper hips run 10cm below your waist line. Make sure the tape measure is parallel to the floor all the way round. Once you have your upper hip measurement refer to our size chart and see which size you are closest to.

Now that we know our size I’ll talk you through each of the pieces so that you can visualise where they will go on the body.
Bra
A - CF Bust Cup - This sits front and centre of the chest
B - Side Bust Cup - This supports the bust and travels over the shoulder
C - Lower Back Strap - This sit at the back of the rib cage
D - Longer Underband - This sits all the way around the rib cage
E - Shorter Underband - This also sits all the way around the rib cage
Pants
F - Front pants - This goes on the front of the pelvis
G - Back pants - This goes on the bum
H - Gusset - This sits in the crotch
I - Front lace overlay - This lies on the side of the front pants
J - Back Lace overlay - This lies on the side of the back pants
K - Leg Lace trim - This wraps around the top of the leg
Ok, now we know what all the pieces are, we are ready to cut out our fabric.
You can either make this pattern in medium weight stretch cotton jersey on its own or combine it with stretch lace. I’m going to use both for this demo so that you can see how to sew the lace. But if you’re not using the lace, no worries at all, simply skip past those steps.
Once you have chosen your main fabrics you will also need some plush elastic and/or fold over elastic. You will need a 1.5-3cm metal ring for the back of the bra. If you are making the shorter underband you will need a 3cm wide hook and eye bra clasp. You will also need a nice strong thread for sewing up the garment on your domestic sewing machine. If you are using an overlocker you will also need four cones of overlocker thread. However, don’t worry if you don’t have an overlocker; this entire garment can be made on a regular sewing machine.
Great, let’s cut out…
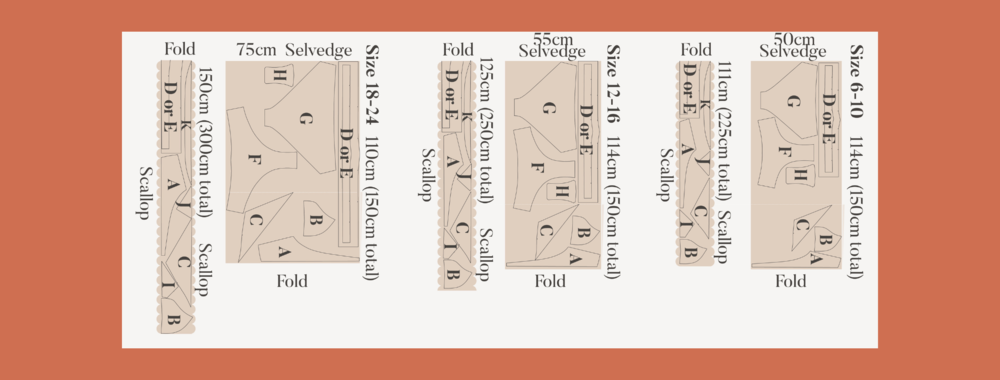
Place your jersey fabric flat on the table, fold as per the lay plan, making sure your selvedges are running parallel to each other. Lay out all the pattern pieces which are cut on the fold or in pairs. Cut carefully around the shapes. Then unfold the fabric and cut out any remaining pieces that you just need one of. You do not need to add on any extra seam allowance; it is already included in the pattern. Your seam allowance is 7mm so only cut very small notches to ensure they stay hidden.
Awesome, now for the lace…
Fold the lace in half, right sides together. Match up the scallops on the edge so that they are sitting exactly on top of each other. When a piece has a scallop edge, lay the pattern piece so that it sits 5mm from the lowest point of the scallop. Cut carefully around the shapes, except where it says scallop edge. Here you do not need to cut because you want to keep the beautiful finished edge of the lace. You do not tend to cut notches in lace; instead mark them with chalk, a pin, or a thread loop.
Great you’re all cut out, next we start sewing!
Day 2 // Elastic & Stretch
Yesterday you cut out all your pieces so we should be ready to go. Today we are going to be focusing on the different techniques we will use to sew elastic. This is the most important aspect of sewing underwear and having a good practice before you start on the real thing will make a huge difference.
There are lots of different types of elastic used in underwear construction. For this pattern you can use 10-12mm wide plush elastic, 10-15mm wide fold over elastic, or a combination of the two. I tend to use plush elastic for the bra and upper hip of the pants and fold over elastic for the leg opening of the pants. Plush elastic is usually stronger and thicker so gives more support on the bra, however you can make the whole set with fold over elastic alone. Fold over elastic is thinner and smoother so helps avoid VPL. If you have bought one of my Josie Bra & Pants Kits it will come with super high quality FOE elastic which can be used to make the whole set.
SPSE, SPRE and SFRE are three different elastic sewing techniques which I will keep referring back to as I make the set. I’ll break down what each one means so that you can have a practice before we start. I recommend grabbing some scraps leftover from cutting out yesterday to practice on.
For all of these techniques you will need to stretch the elastic as you sew so let me give you a few top tips about how to do that.
You want to gently stretch the elastic as you sew, roughly 10% more than the fabric you are sewing. So if the length of fabric is 30cm long the elastic should end up pulling it in to 27cm. When you first start out sewing elastic I find the easiest way to judge this is by cutting your elastic the same length as the fabric, then working out how much should be overhanging at the end if you have stretched it 10%. In my example we would have 3cm of elastic overhanging at the end to trim away. Once you have become practiced at stretching the right amount you will do it automatically and won’t need to measure and cut each length. Simply keep the elastic in one long piece and cut it once you have sewn each section; this avoids ending up with lots of wasted little lengths of elastic.
Top tip: Over stretching the elastic will cause the fabric to shrink and gather too much. A friend of mine calls this the crispy bacon effect, because the fabric shrivels up like bacon in a hot pan. If you under stretch the elastic the fabric will stretch out too much and the bra and pants might not fit.
The only way to find the right balance is practice until it becomes second nature, so spend a little time getting used to it.
Day 3 // Bra Focus
Yesterday you learnt lots of elastic sewing techniques, today we will put those skills to use as we make the Josie Bra.
On the lower back strap (C), first sew plush or FOE elastic to the scallop edge using the technique in the SPSE section. Make sure you start the cut edge of the elastic on the drill hole which we marked using a pin.
Then sew plush elastic along the longer side of the triangle (not the under bust side which has a notch), using the technique in the SPRE section. Make sure when you do your first line of zigzag stitching that you stitch the non-plush side of the elastic to the right side of the lace. When you flip the elastic it should cover the raw edge of the first piece of elastic you sewed on at the drill point.
If you are making the bust cup with lace and jersey on both sides of the cup mount the lace onto the jersey on the CF bust cup (A) and side bust cup (B), with both the jersey and the lace right side up. Do this by pinning them together all around or using temporary spray adhesive.
Now place your double layer CF bust cup jersey piece (A) lace side up on the table, then the double layer side bust cup piece (B) lace side down on top of it. Pin along the over bust seam matching the notch. Sew with a long straight stitch and/or overlock, taking care that all 4 layers are matched up.
Pin the jersey to the lace on the CF straight edge, remembering that the lace scallops will be wider than the jersey. Ensure everything is laying flat. With jersey side up, sew a piece of plush elastic along the edge of the jersey to enclose the raw edge, using the SPSE technique.
Sew elastic all the way along the armhole (A/B) using the SPRE technique. Make sure that when you do your first line of zigzag stitching you stitch the non-plush side of the elastic to the right side of the lace.
Overlap the lower back strap (C) onto of the side bust cup piece (B) along the under bust line, matching up the side seam notch. Stitch them together along the under bust seam with a straight or zigzag stitch, 5mm from the edge. Then lay them flat and straight stitch in a triangle along the on top of the elastic, in order to secure them together.
Pin the cup pieces (A/B) onto the top edge of the underband (D or E), following the notches; the CF elastic should be just meeting (the lace will overlap slightly). Sew the band on with straight stitch.
With the wrong side up sew plush elastic all the way along the seam allowance of the top of the underband (E/A/B), using the SPRE technique.
Using the same technique, sew plush elastic all the way along the bottom of the underband to enclose the raw edge.
Open the bra fasteners, then poke the left bra band inside the side of the fastener that has the eyes, with the eyes facing outward. Change to a zipper foot and straight stitch over the top to secure. On the right side of the band, poke into the fastener with the hooks facing inwards, straight stitch to secure.
Pass the point of one of the lower back straps (C) through the ring and straight stitch in place, making sure that you do a few extra back stitches to make it super secure. Measure the other strap against the one you’ve sewn and mark with a pin the point where it goes through the ring. Then pass it through the ring so that they are the same length and sew the same as before.
Try on the bra and pin the front straps onto the ring in the position that feels comfortable. Sew the font straps on to the ring using the same method as before, ensuring that the straps are the same length.
Wow, you’ve made the Josie Bra, well done! Don’t forget to share your progress pictures on Instagram with the hashtag #JosieBraandPants.
Day 4 // Pants Focus
Today we are going to focus on the pants which should be a walk in the park after yesterday.
To start pin lace overlays in place at the side seam of the pants right sides up. Front lace overlay (I) goes on the front pants (F) and back lace overlay (J) goes on the back pants (G). Use a small zigzag stitch to sew in place 5mm from the edge of the lace.
If you want you can now neaten the front edge of the gusset (H) with overlock or zigzag stitch, to be honest I tend to leave this edge raw, as it’s jersey it wont fray.
Pin the front and back pants (F,G) together at the crotch, right sides together. Then pin the gusset (H) at the back, with right side of the gusset against the wrong side of the back. Sew with a straight stitch.
Flip the gusset to cover the seam you’ve just sewn, and pin flat on the inside of the front pants. Sew in place using a straight stitch across the top of the gusset. Pin the side seams (F,G) right sides together and overlock or straight stitch.
Using the SPRE technique sew elastic all the way around the upper hip, overlapping the elastic by 1cm at the end to close the circle.
Sew elastic to the leg openings, using the SFRE technique section (if you decided to use FOE, otherwise continue using plush instead).
If you are using the lace leg trim (K) you will want to sandwich this between the elastic and the fabric with the right side of the lace touching the right side of the fabric. Sew all three layers at once. The lace should start and finish at either end of the gusset rather than reaching all the way around. The lace should be slightly stretched as you sew it.
Wow, you’ve now made the entire set! Congratulations. I hope you love wearing them.
There are so many opportunities to get creative with this pattern. So stay in touch and let me know how it goes. Don’t forget to tag #JosieBraandPants on Instagram so that our sewing community can see what you’re making.